
How to Conduct a Personal Data Privacy Audit on Facebook
- Dani
- Jun 19, 2024
- 5 min read
Updated: Dec 23, 2024
Updated by: Junella & Stella In today's digital world, we rapidly share our data online, often without a second thought. Platforms like Facebook collect everything from names and emails to shopping habits; creating a detailed digital footprint. While this data-driven convenience can be beneficial, it also raises critical questions about data privacy.
Data privacy acts as a shield, preventing unauthorized access to your vital information and ensuring it is processed transparently and according to your preferences. Understanding and managing your data privacy is crucial to protecting your online presence. This guide will show you how to conduct a data privacy audit on Facebook, helping you take control of your information.
Access the Privacy Checkup in a Web Browser
Step 1: Navigate to Settings & Privacy
Log in to your Facebook account. Click your profile picture to open a menu, then select Settings & Privacy and click Privacy Checkup.


Step 2: Choose a Privacy Checkup Topic
The Privacy Checkup covers various aspects of data use and protection on Facebook. Choose a topic to begin auditing your data settings.

Control Who Can See Your Information
Step 3: Adjust the Profile Information Visibility
Click on Who can see what you share? and review the settings for your profile information, posts, and stories.

In this section, you can control the visibility of your personal information, such as your email, birthday, address, and workplace. For each piece of information, you have the option to set it to Public, Friends, Friends of friends, or Only me. To maximize privacy, select Only me for sensitive information.

Here, you can determine who can see your future posts and stories. You can choose from Public, Friends, Friends of friends, or Only me. This section also allows you to limit the audience for your past posts by changing them from Public or Friends to Only me or another restricted audience.

Review your blocked users list. If you want to unblock someone, you can do it here. Blocking helps prevent specific individuals from interacting with you or seeing your content.

Once done, click Review Another Topic.

Manage your Friend Requests and Profile Visibility
Step 4: Navigate to How People Can Find You on Facebook
After completing the previous checkup, navigate to How people can find you on Facebook? to manage how your profile is discoverable.
Another reason we need to audit this is that Facebook will use your related information about you, like your friends, your name, and your phone number, to be able to be searched on, for example, Google, a random bot, or a scammer trying to make a friend request. More so, we can protect our data privacy.

Adjust settings to control who can send you friend requests, limiting it to Friends of friends or other preferences. Review any pending friend requests you have. Decide whether to accept or delete these requests based on your comfort level with the individuals.

Choose whether Everyone, Friends of friends, or Friends can look you up using your email address and phone number. For increased privacy, select Friends or Only me.


Decide whether you want search engines like Google to index your Facebook profile. Turning this off means only Facebook users can find your profile through Facebook search.

And that's it! You're ready for the next topic, which is Account Security.

Enhance Account Security
Step 5: How to keep your account secure
This topic discusses how to check if your password is secure and if it needs additional security and login alerts.

Ensure your password is strong, unique, and updated regularly. A strong password includes a mix of uppercase and lowercase letters, numbers, and special characters.

Enable two-factor authentication (2FA) to add an extra layer of security. Facebook offers authentication apps, SMS codes, and security keys.

Set up login alerts to notify you of any unrecognized login attempts. You can choose to receive these alerts via email, SMS, or through Facebook notifications.

And you're all set, next topic.

Data Settings and Ad Preferences
Step 6: Manage Your Data Settings
Manage which apps and websites have access to your Facebook data.

Review the list of apps and websites connected to your Facebook account. Remove any that you no longer use or trust to prevent them from accessing your data.
Check the permissions each app has and revoke any unnecessary access. This helps ensure that only trusted apps can use your data.


Step 7: Configure the Ad Preferences
Control how Facebook uses your data to personalize ads.

While you cannot remove ads entirely, you can limit how Facebook uses your data to show personalized ads. Review and edit the interests Facebook uses to target ads to you.

Decide whether to allow your friends to see your interactions with ads. You can set this to Only me if you prefer to keep your ad interactions private.

That's the last part of the privacy checkup. We’ll next discuss how to download the information to take a more thorough look at the data that Facebook has gathered from you.

Download Your Personal Information
Step 8: Navigate to Settings
Go to Settings & Privacy, then Settings, and scroll to Your Information. Click Download your information and then the continue button.


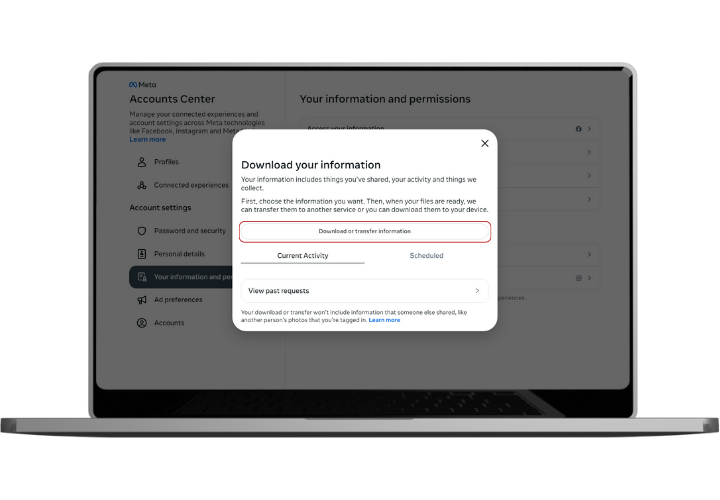
Step 9: Finalize Download
You will see Current Activity or Scheduled, but for now, click Download or transfer information.
Select the account or profile that you want to get information on, and then click Next.

Select the types of data you want to download, such as posts, messages, photos, and more. You can choose to download all your data or specific categories.

Click Download to device, but you can also transfer your data. Remember, if you are going to download your information, make sure you have enough storage to accommodate it.

It will give you an overview before they compile your information. You have the choice to change the data range, notification, and the format and quality of the data you want to get; the higher the years, the bigger the storage you need. Once done, simply click Create Files.


Step 10: Download Your Data
After selecting the desired data and settings, click Create File. Facebook will compile your information and notify you when it’s ready to download.
Click the Download button.

You will be prompted to enter your password to verify your identity. Once verified, Facebook will generate and download a file containing detailed information about your activities on the platform, as well as data they have collected about you.

Check your Activity Log
Step 11: Audit the Activity Log
Navigate to Settings & Privacy and access the Activity Log to review what data Facebook has collected from your activities. Check various categories to ensure no unexpected data usage.


This is another method to review the data Facebook has collected from you, providing a different aspect of a data privacy audit. You can click on any category of data you are concerned about regarding your privacy. For instance, if you select Search History, Facebook will display a list of your searches made through their search bar. Due to privacy concerns, I can't share specific examples, but I encourage you to explore these categories to understand how Facebook collects and uses your data.


